

I absolutely LOVEEEEE this dress!!
My baby ROCKS the hell out of it!
Alright, I am going to explain how I started out. I didn't take pictures of the supplies needed, but there is nothing that you shouldn't have already... Besides maybe elastic?
The fabric I chose for this dress, is a solid mint that was purchased at Joanns, as well as a light pink with white polka dots, also purchased there.


I let her choose her own fabric, and it was a cluster of all pinks, so I took it upon myself to throw in a solid color. I don't use solids as much as I should. Or hell, want to. LOL.
Start by pressing your fabric. I had to do this on the floor, as my lovely, handsome husband, hasn't built me a proper cutting table. Honey do list is getting quite long!!
This dress once finished will be 28" long. It will skim the her ankles. If you don't want it to the ankles, that's fine, just measure accordingly. Just remember there will be an added panel at bottom (light pink dots for my dress)
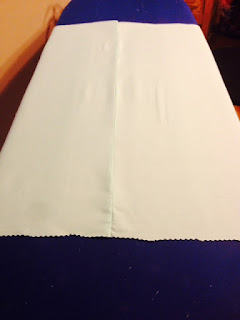
So, I laid out my fabric and cut, using pinking shears, 22" (selvage to selvage) by 36". Press your fabric once more.


I also cut out (of the pink polka dot fabric) 2- 6" x 22" strips. (selvage to selvage). Two strips for the bottom band. At the end you should have two long strips of 6" x about 45" pink polka dot fabric.
So you will end up with TWO (mint pieces) 36" WIDE x 22" LONG. Right sides together, sew up one side seam. Please remember that the side seam is the 22". Press open.

Do the same with two of the polka dot pieces. Just on one side seam only.


Now open the dress part (mint for me) with the one sewn side seam in the middle. Right side up. Line up the pink polka dot band side seam, wrong side up, to the seam on the dress. Basically right sides together and side seams matching.


Now to the long ass part of sitting at your machine for a tad bit longer than usual. You are going to pin the hell out of the dress. Pinning the whole bottom band to the main part of the dress. Pin and pin, and keep pinning!
Head to the mean machine, and stitch all the way down. Connecting the two pieces. I used a straight stitch, but if you are more comfortable zigzagging, go ahead! Just don't forget to backstitch!!


Alrighty, you should have one long piece of mint and pink polka dot fabric. Time to stitch the second side seam.
Make sure to match up the band seam (pink polka dot) before stitching. Using a straight stitch and backstitching.
After pressing open the side seams, you should have a dress that will be about 70" AROUND.
Lets get to making the top of the dress, including the elastic casing.
Start by folding down 1/4" and pressing or go ahead and use your serger. Lucky you, but a serger is on my Christmas list!!! Please Santa, please!
After folding down and pressing (or serging), fold down another 2" and press.
Sew a straight stitch along the bottom of the 2" but make sure to leave a 1" opening in order to insert the elastic. We are creating a casing.


Now after we are done with another session of long ass sewing, we are going to sew a another straight stitch 1" from the first. BUT don't leave a 1" opening (like we did for the first line).


At the end, you should have a 1" casing for your elastic. Making the top of the dress the "paper bag style".
Lets create the straps!!


So, I cut two 6" x 11" strips of the polka dot fabric. I pressed them flat. Then right sides together, stitch a straight stitch all the way down the entire length of the strip. Leaving both ends open.
Turn straps and press with the seam open in the middle. This will be on the back side of the straps.
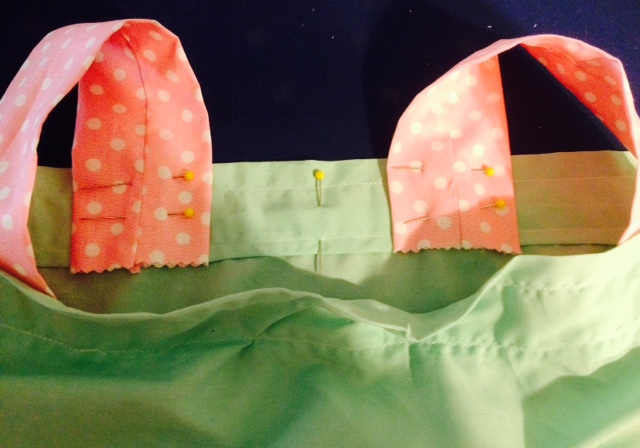
To attach the straps to the dress, we have to find the center of the dress.


Mark center with two pins. Now pin the straps at an angle 8" apart. Each strap should be 4" from the center of the dress.


Now using the casing stitch as a guideline, use a straight stitch to attach the strap to the dress. Stay on the same stitch line as the casing. This is why there is no need to stitch the ends of the straps together.


Alright, alright, alright! Time for the elastic, to make it look like a dress, and not some HUGE mumu, that would swallow your child whole.
Cut 3/4" elastic the size of the bust of the child the dress is for. Mine is 20"
Attach a safety pin to both ends, and start fishing it through the casing. Super difficult, as its a huge amount of fabric, but its works in the end.

HOLY CRAPAZOIDS!!!

HOLY CRAPAZOIDS!!!
That was intense!!!! Yet, it has an amazing turn out!
After connecting safety pin to safety pin, hurry and zigzag stitch like 6 times, to connect both ends of elastic. You do NOT want to lose a piece of elastic in the dress, and have to do that over again. OMG. Gag me. LOL.
Now time to close the casing up. DO NOT STITCH OVER THE ELASTIC WHEN DOING THIS. I have done this on my dress, cause someone knocked on the front door, and scared the be-jeebies out of me and yeah. Really.
Sew over the original casing line, and start rearranging your ruffles. This is gonna be a pain in the you know what, but it will be worth it!!!


Turn up the hem at the bottom of the dress to the desired length, press, and stitch around this big dress one. last. time.
You can add a bow on top (I used a safety pin, for washing, but be careful with baby fingers who like messing with it) and TA-DA!!!!!!
Stand back and make your little one twirl and twirl away!


Thanks for lasting through another long tutorial, and please leave any comments/questions below!
Happy Stitchin'!
No comments:
Post a Comment