


Alright, alright, alright....
So this is my first tutorial on a sewing project of mine. I have made so many pillowcase dresses, that I sometimes dream about an idea of what design of fabric I can use next!
Fabric shopping is literally my favorite thing. Besides, ya know, pizza, Netflix, RedBull, staying in PJs all day... list can go on. Haha.
The fabric I used for this dress, I bought off Amazon. Kinda expensive for me, but I LOVED it. I bought it using this link...
I just LOVE Michael Miller prints. Everything is amazing!

I paired the Narwhal fabric with a navy and white chevron fabric that I bought from my local Joanns. SUPER CUTE, right? Yeah my thoughts exactly.
This is based on my 4 year old, but its easy to adjust to fit any size. You can even make them in a size for a shirt for an adult! Hello, Christmas presents!!
For this project I used:
Pinking Shears (best thing EVER)
Tape Measure
Sewing machine + matching thread
Iron + Ironing board
Fabric of your choice. Can use one fabric or two. I chose two!
2 pieces of 1/4" elastic cut at about 4in.
2 safety pins
Pattern for sleeves (shown below)


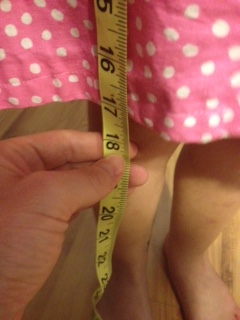
Start out by measuring the child that its being made for. Starting at the armpit to the knee. (its not going to be at the knee when we are finished.)
For my beautiful little Bell (size 3-4T), I ended up with a measurement of 18"

Make sure your fabric is prewashed. I necessarily don't do this every time, but I've always heard you need to do it. Luckily, no problems have popped up.
Iron your fabric.
Cut a 18" (length) by 14" (width)
I measured my little ones waist (20") and with the fabric still folded, I added a few inches for fullness.


Iron again. As since my fabric was folded for awhile in my "stash"... Don't ask.
Lay out fabric flat on your white (arghhhh) table with kitten foot marks all over it. Again. Don't ask.
Place paper made pattern of sleeve on the top edge of the fabric. On the fold side first. (I don't know why I do the folded side first, just a preference of mine.)
Flip dress over and repeat on the other side.


Now on to the sewing machine!
Flip dress with right sides together, lined up perfectly and press.
Pin the non-folded side and sew with a straight stitch.
MAKE SURE TO BACKSTITCH ON EACH END!

After sewing is complete, turn "tube" right side out, and press again.
Deal with Alice the Malice taking a break on your project, and go hang with the kiddos, or make them something to eat for the 100th time today... Or ya know, go hide in the bathroom until the sleeping kitty decides to wake up. Who cares, right?

Ok now that she is up... it only took about 30 minutes. I was able to sneak in a bowl of Fruit Loops. Since all THREE kids are sleeping, I can finish... When the hell does that ever happen these days?
NEVER, I tell ya, NEVER!!!!!
Alright, now we need to create the casing for the elastic.
Turn your dress inside out again, and fold down towards the wrong side of the fabric 3/4" inch.
Then fold it over one more time and press.

Flip dress over and repeat on the other side. Take it to the sewing machine and sew a straight stitch close to the edge. I don't know an exact measurement, but you can see with the photos that its pretty darn close!

Now to add the elastic. This will start making it look like an actual dress. This is when I start feeling good, and excited to see the end project.
Attach a safety pin to one end of the elastic.

Fish it through the casing until you get the other end of the elastic at the end of the casing.

Sew that end down. How I do it, is using a straight stitch, sew over the elastic and the casing, and then backstitch back to the beginning. Repeat that about four times. Like I've said, this might not be the conventional way, but I've made so many dresses, and nothing has happened. Everything has held up perfectly. Even through the wash multiple times.

Trim excess elastic. Now to start fishing the elastic through the other end of the casing. You can pull it all the way through the end of the dress, and you'll notice the dress to start "scrunching". This is what needs to be done!
Keep scrunching until you are satisfied with the look. While holding the elastic with the safety pin, take your dress to the sewing machine and repeat the straight stitch, backstitch process until its secure. Trim off the excess elastic once more, sit back, and pat yourself on the back. You have the makings of a pillowcase dress!


Now repeat with the other casing. Making sure you "scrunch" your dress the same length as the other side. You don't want a dress super scrunched on one side, and then loosely scrunched on the other. Not flattering. :/
Lay your dress out, and you should have a dress with two scrunchy neck pieces and about 15" long. If not its totally ok! Seriously, its a pillowcase dress. :)

Ok, now I'm going to add the bottom chevron part of the dress. Since our dress is about 14" wide folded, I'm going to cut a 14" wide by about 3.5" long part of the chevron.
Remember to cut on the fold and press your fabric. Unconventional I KNOW! But the dress at the end will look BEAUTIFUL! I promise.
With right sides together, sew a straight stich up the side of the chevron. Backstitch, backstitch, backstitch.
Now that you have a small long tube of chevron, time to attach it to the dress.
With the dress right side out (pretty design out) and the chevron inside out (wrong sides out) slip the chevron part over the bottom of the dress. You will end up with the right sides together. See picture!

Pin around the bottom of the dress making sure not to sew the bottom of the dress together. YES I have done that before. Felt stupid.... :/

I always start at connecting the sides seems together. and then going around until I get back to the side seams.

Sew them together using a straight stich and once again BACKSTITCH. Goodness, I don't know how important backstitch is... LOL.
After your done stitching, flip chevron down and press flat. Tada! Turned out beautiful!!

Now we need to hem the bottom. Turn dress inside out. I fold 1/2", press, and then another 1/2" and press again. I usually don't pin this, but you are more than welcome to!
Sew a straight stitch all the way around the dress, backstitching, and press once more.

B-e-a-uuuuutiful!
Now, on to probably the wrong way to use bias tape. BUT I don't like rules. I have made every dress this way, and absolutely nothing happens. I have heard bias tape needs to be cut a certain way, against the grain, blah blah, but I don't do that. At all.
I go back to my Narwhal fabric. Unless you want the sleeves to be chevron. Totally up to you. I fold the fabric (in any direction, as is the pattern doesn't have to be the same direction as the dress... you'll see in the pictures)

And cut at about an inch and PRESS. I don't really check how long the strips are gonna be until the end, but right now they are about 17" long. I get it, there's probably an easier way to do this, but I DON'T LIKE RULES. :D

Unfold your strips and you should end up with a two inch wide, however long strip. Mines 17". Perfect.
Take this to the ironing board. Unless you have one of those handy dandy bias tape makers, then by all means use it!
I already have a center press in the middle from pressing before I cut. Fold the edge towards the center of the wrong side of the fabric. See pictures for easier clarification.


Press, press, and press some more. Repeat with the second strip.
Now take this to the dress. This is where it gets tricky, but it ends up awesome. Seriously. Even without following the rules.
Open the dress, to where the sleeve openings are touching. See picture.

Find the center of the bias tape and the center of the sleeve. Put the sleeve on the MIDDLE seam of the bias tape. Its hard to explain and take pictures, since the fabrics are the same AND on a white table. ARGHHH. But I'll try and get accurate pictures.


You are basically wrapping the sleeve in the bias tape. Pinning from the center towards each end. You should have a pin from one end of the elastic neck piece on the "front" of the dress to the elastic piece of the "back" of the dress. There really is no front or back, unless you were to embroidery a design on one side. Which I have done, and it turns out even more beautiful.
Repeat on the other sleeve as well.
Take the dress to the sewing machine but don't sew the whole bias strip. Just elastic to elastic using a straight stitch. Repeat on the other side as well.

Now, this is gonna sound really weird. TRUST ME. Seriously. Its gonna work.
Now after sewing a straight stitch across the bias tape connecting to the sleeve, you should have a sewn sleeve with each ends of the bias tape still open. I will try and explain with pictures. Bear with me please. LOL.
After eye measuring the dress I trimmed off about an inch on lets say the "back" of the dress.

After that, I laid out my dress and pressed the bias tape just for extra security, so to speak.
I folded the longer end down just a tad, and press once more.


Now this is tricky, I put the smaller end of the bias tape INSIDE the longer piece. Pictures, people! LOL.


Then I lined up the longer bias tape (with the folded end) to the back of the dress with the elastic casing. Pinning down, or holding real tight, take it to the sewing machine and sew a straight stitch, from elastic to elastic.

Repeat for the other sleeve. Sit back, sip your wine, and tada! You've made a pillowcase dress!!!!


NOW you have a beautifulllll pillowcase dress!!
You can make a matching hair bow out of the same fabric. I have attached a sample bow from a pillowcase dress I've made previously. A future posting will show you how to make all types of bows, including this SAMPLE one below.


(last picture shows a detachable bow that I added last minute. Future post with show how I did it!)
Thank you for sticking with me throughout my first TUTORIAL on sewing. I appreciate you vistin' and happy stitchin'!!
Wonderfully done!! You kept it interesting and still explained every step very well! You do such beautiful work!!
ReplyDeleteAwww, thanks Caitlyn!!! You are too sweet <3
Delete